Instructions For Assembling A Pedicruiser Cart To A Huffy Fixed-Frame Bicycle
Downloadable Instructions hereReal-world DIY bicycle sidecar builds using steel-angle frames, 20" wheels, and mockup for chassis layout. Perfect to kick off planning.

Steve Bod's Instructables example and Good Spark Garage's frame mockup visualized.
Videos That Capture My Idea
Instructables "Build a Bicycle Sidecar" includes CAD sketch-driven frame templates and step-by-step build instructions using 25mm angle iron and standard 20" wheels. :contentReference[oaicite:2]{index=2}
View GuideTechnical forum guidance: sleeve tubes before welding, gusset reinforcement, and three or five-point mounting including upper strut details. :contentReference[oaicite:3]{index=3}
Read TipsWireframe mock-ups and layout planning before cutting or welding. Great to visualize the basic geometry.
Shows jigs, tacks, and connector bar alignment welding-prepping for the real welds.
Shows actual welding of connector bar to mainframe-hands-on technique.
Final alignment adjustments, bolt hardware, hull cleanup, and first ride tips.
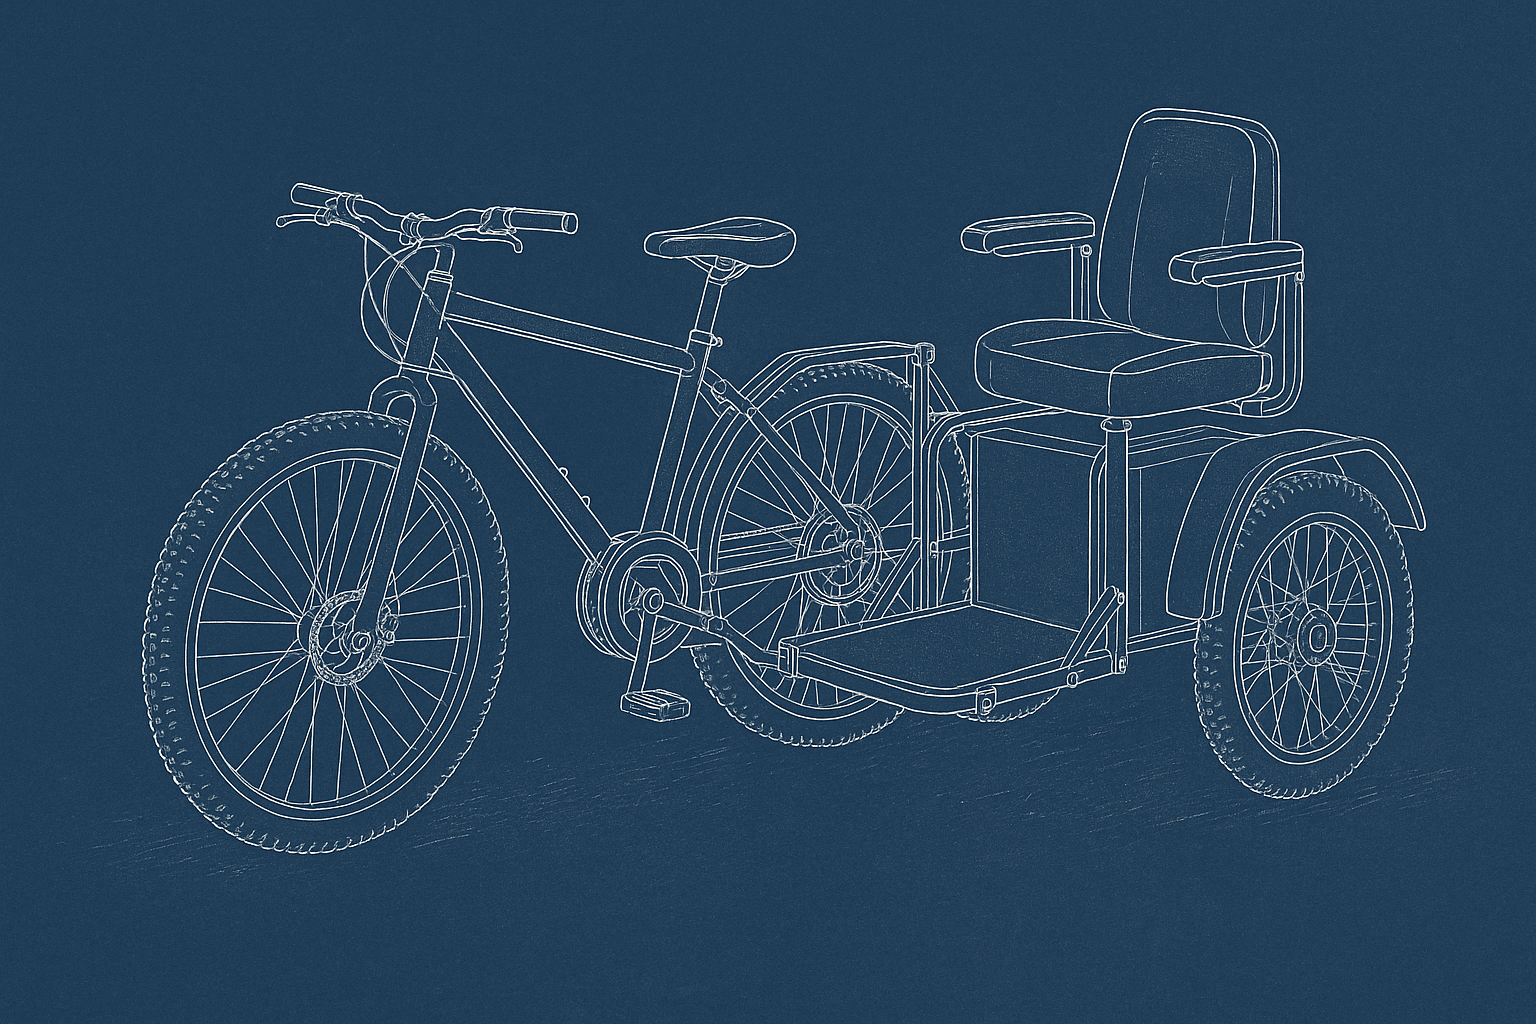
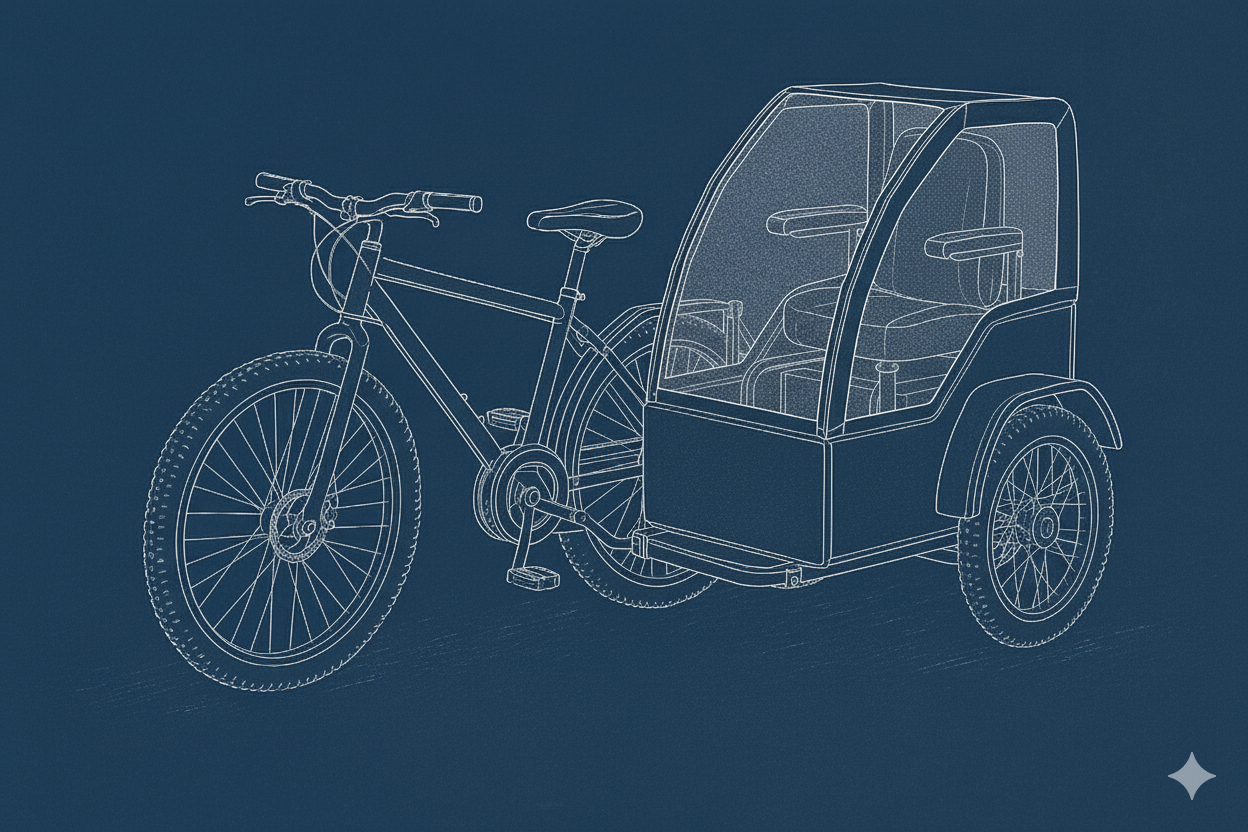
The following is a general step-by-step guide that can be adjusted to suit the bicycle and attachment you want to put together. My idea was to craft this as a rigid HPV (Human Powered Vehicle) that can be used in the place of motorized transportation. In this era of challenging fuel prices, the race is on to create efficient vehicles that minimize the carbon footprint and get you from place to place as inexpensively as possible.
Whether you're a seasoned wrench-turner or just diving into custom fabrication, this project is your gateway into lightweight frame welding and vehicle assembly. If you've tackled mechanical repairs or upgrades before but never picked up a welding torch, don't sweat it-MIG welding is widely considered the easiest method for beginners to learn. It's forgiving, intuitive, and ideal for the kind of steel tubing commonly used in bike frames and cargo trailers. The goal here is to empower you to build something durable, functional, and environmentally smart-using basic tools, some elbow grease, and the same determination that's gotten you through your other DIY adventures. We'll walk you through what gear to grab (most of which can be sourced from places like eBay, Ace Hardware, or Amazon), how to set up your workspace, and where to find no-nonsense video guides to visualize each step. By the end, you'll have not only a working HPV rig-but the confidence to tackle future welding projects head-on.
Step 1: Planning, Measuring, and Frame Prep
Before the sparks fly, it's all about precision, vision, and layout. A solid sidecar build starts with a solid plan.
Begin by placing the mobility cart alongside your Huffy mountain bike to get a feel for wheel alignment, overall width, and ride height. Use chalk or painter's tape on the ground to mark where everything will sit once bolted together. You're aiming for three key anchor points that will form a rigid triangle between the bike and the sidecar. These mounts will keep everything stable at speed and across uneven terrain. Using a level and ruler, measure and record the following:
- Distance from bike bottom bracket to the front and rear mount points
- Height of the cart's frame from the ground (aim to match the bike’s axle height)
- Wheelbase alignment and sidecar wheel lead (usually 10–15% of the bike's total length ahead of the rear axle)
Essential Gear & Tools (Beginner-Friendly)
These tools will get you up and running for your first metal frame welding project—sourced from eBay, Ace Hardware, and Amazon.

Auto-Darkening Welding Helmet
Protect your eyes while keeping both hands free. Adjustable and great for beginners.
Retailer: Amazon

Angle Grinder (4.5")
Perfect for cutting, grinding, and cleaning metal tubing.
Retailer: Ace Hardware

Beginner MIG Welder (No Gas)
Easy-to-use flux-core MIG welder. Ideal for welding mild steel and perfect for starters.
Retailer: Amazon

Magnetic Welding Clamps (Set of 4)
Keeps your metal pieces aligned at 45°/90° while you tack-weld.
Retailer: Amazon
Helpful YouTube Tutorials for Beginners
Even if you've never welded before, these creators break it down step-by-step.
MIG Welding for Beginners
How to weld thin steel tubing with flux-core wire. Beginner-friendly explanation.
Sidecar Welding Mount Overview
See how welders layout the structural points for a rigid side-mount system.
Step 2: Fabrication & Tack Welding
With your measurements dialed in and your tubing prepped, it's time to bring this frame to life-one spark at a time. Think of this stage as roughing in the skeleton of your sidecar rig before you fully commit to anything permanent.
Start by laying out your steel tubing on a flat fire-safe surface-ideally with a steel workbench or a concrete garage floor. Keep your main sidecar frame rectangular or triangular for strength and simplicity. The frame should align level with the bike's rear axle and provide stable base support under the cart's wheel. Use your magnetic clamps and corner guides to hold angles square as you begin assembling the base shape.
- Double-check all angles with a speed square or framing triangle
- Use scrap tubing or temporary gussets to brace the corners before welding
- Begin tacking pieces together using short 1/2-inch welds at the joints-don't fully weld anything yet
Work slowly and let each tack cool for a few seconds before continuing. Too much heat at once will warp thin steel and throw off your geometry. After you’ve got your base done, move on to tacking the three support arms that will mount from the sidecar frame to the bicycle: one low near the bottom bracket, one high near the seat stay, and one near the rear dropout.
Alignment Tip: Have a friend hold the bike upright or strap it to a tree/post to ensure the sidecar attaches straight. Check tire alignment and ride height one last time before locking in the frame.
Watch: DIY Sidecar Frame Assembly Techniques
Step 3: Full Weld Passes & Sidecar Mounting
With the frame tacked and squared, it's time to commit. This step transforms your temporary structure into a ride-ready, load-bearing chassis-solid, reliable, and built to take a beating.
Start by checking all your tack welds. If anything shifted during mock-up, now's the time to break a tack and re-clamp. Once you're confident in your layout, begin laying full weld beads at each joint. For mild steel tubing, run your MIG welder between 90-110 amps using .030" solid core wire with CO2 or a 75/25 Argon/CO2 shielding mix.
- Weld in short bursts, alternating between joints to prevent warping
- Let each weld cool slightly before welding the opposite side of the same joint
- Use multiple passes on stress-bearing joints like mounts and crossbars
Once all welds are complete, clean them up with a wire wheel or flap disc on your angle grinder. Inspect for porosity (tiny holes or bubbles), cracks, or weak penetration. If you see any, grind them out and re-weld until you get clean, strong fusion. Now it's time to mount the frame to the bike. Using your industrial-strength U-bolt or bolt-on bracket kits, secure the three arms to the bike’s frame at the following points:
- Mount 1: Down near the bottom bracket or lower frame tube
- Mount 2: Mid-height, at or near the seat stay or water bottle cage bosses
- Mount 3: Rear triangle or dropout area, using existing eyelets if available
If your mounts require drilling into the bike frame, be cautious-ome bike tubing is thin and doesn-t like being modified. Use rubber bushings or washers to reduce vibration and stress. Once all three points are secure, give the sidecar a shake test. There should be zero flex at the connection points.
Road Test Tip: Start slow in an open parking lot. Practice turns and stops. Sidecars change how bikes handle. You'll feel the difference immediately.
Watch: Full Weld Techniques & DIY Bracket Mounting
Step 4: Finishing Touches, Paint, and Accessories
The hard part's done, and now it's time to give this rig some personality and protection. This step is all about durability, weatherproofing, and turning heads on the street.
First, degrease and prep the entire sidecar frame for paint. Any leftover oils from your hands or grinding dust will ruin paint adhesion. Use acetone or denatured alcohol and wipe it down with a clean rag. Lightly scuff all metal surfaces with a sanding sponge or 220-grit sandpaper to give your primer something to grip.
- Apply 1-2 coats of high-adhesion metal primer (Rust-Oleum Professional or similar)
- Let dry 24 hours, then hit it with 2-3 coats of enamel paint or a durable rattle can clear coat
- Optional: Add reflective tape, stripes, or custom decals for extra visibility
While the paint cures, think about how you want the cart itself to function. Do you want a platform to haul groceries? A secure child carrier? A mount for a cooler or toolbox? This is where your vision takes shape.
Mount the cart to your finished frame using heavy-duty hardware-bolts, washers, and lock nuts. You might also want to bolt or weld in:
- Fenders: To keep mud and water off your cargo
- Lighting: USB rechargeable LEDs or solar bike lights
- Weather protection: A tarp or plastic fairing if you ride in the rain
Once everything's mounted, go for another road test. Listen for rattles, creaks, or movement in the mount points. Re-tighten everything after your first mile. And when it feels rock solid, take a victory lap.
Paint Tip: Let everything cure for 2-3 days before hard use to prevent chipping or soft spots.
Watch: DIY Bike Sidecar Paint + Cargo Setup Ideas
DIY Sidecar for a Mountain Bike: Step-by-Step Guide
This step lays the foundation. You'll decide placement, dimensions, and clearance for your sidecar project. Your goal: a rigid, stable frame that doesn't affect bike balance too harshly.
Sketch out measurements and assess the bike's frame geometry. Focus on three main mount points (low, mid, rear) on the right side.
Tools & Parts Needed
- Measuring tape
- Marker or chalk
- Digital level (optional, for squaring)
- Reference: How to Plan Custom Sidecar Dimensions
This is your mock-up stage. Pieces should be held together using tack welds-small, temporary beads-to verify alignment before final welding.
Use clamps and jigs if needed. Double-check all angles and spacing before committing to full welds.
Tools & Parts Needed
- Mild steel tubing (1" square or round)
- 90° magnetic welding clamps
- MIG welder (entry-level Lincoln or Hobart preferred)
- .030" flux core or solid wire
- Auto-darkening welding helmet
- Reference: Tack Welding Basics
With tack welds confirmed, now it's time to lay down permanent welds and attach the sidecar frame to your bike.
Alternate between joints and let metal cool between passes. Once complete, mount using heavy-duty U-bolts or custom bracket hardware.
Tools & Parts Needed
- Angle grinder with flap discs and wire wheels
- 3x Industrial U-bolts (1.25" inner diameter)
- Grade 8 bolts, washers, and locknuts
- Rubber spacers or bushings
- Reference: Welding Strong Joints for DIY Rigs
Now that the frame's rock solid, it's time to weatherproof and accessorize. This gives your rig a clean finish-and long-term durability.
Scuff, prime, and paint your metal frame with enamel or epoxy paint. Add reflectors, lights, or cargo containers to suit your needs.
Tools & Parts Needed
- Rust-Oleum metal primer
- Enamel paint (spray or brush-on)
- Reflective tape or decals
- Weatherproof LED bike lights (USB or solar)
- Optional: Lockable storage bins or custom cargo rack
- Reference: Painting & Accessorizing DIY Bikes
Before you hit the street or trail, it's time for a thorough shakedown test. A safe, stable ride is everything.
Push the bike manually and test turns. Then do slow-speed test rides in a safe area. Listen for creaks, check bolt torque, and inspect welds for any signs of stress or cracking. Add Loctite to bolts and reinforce joints if needed.
Tools & Parts Needed
- Torque wrench
- Loctite threadlocker (blue for removable)
- Rubber mallet for minor adjustments
- Basic bike repair toolkit (multi-tool, hex wrenches, tire pump)
- Reference: Test Ride Safety Prep for DIY Rigs
Pedicruiser - Huffy Bike Weld - On Sidecar
No fluff, pure build energy. Gen-Z style.
1. Overview & Resistance Strategy
- Don't just tack onto thin alloy. Drill through frame tubes, insert 20mm steel sleeve, weld ends to reduce HAZ robustness. :contentReference[oaicite:10]{index=10}
- Use a 3-point system: lower front, lower rear, upper strut. Ensures stability & adjustability. :contentReference[oaicite:11]{index=11}
- Set wheel lead 8-10" ahead of rear wheel, toe-in 1/2-3/4" over 8ft, and lean-out 2-3° for neutral tracking. :contentReference[oaicite:12]{index=12}
2. Tools & Parts Shopping List
| Item | Spec / Qty | Notes |
|---|---|---|
| Steel angle tubing | 25 mm x 3 mm (1" x 1/8") | Frame brackets |
| Steel tube sleeves | 20 mm x length to match frame x 3-5 mm wall | Inserted into bike frame |
| TIG welder + ER70S-2 rod | 1 unit | Low-heat control |
| Heim joints / rod ends | 3/8" bore (Qty 2) | Upper strut pivot hardware |
| Grade 8 bolts | 3/8"-16 x 2" (Qty 6) | With lock washers / nuts |
| Angle gauge | 0-5° digital | Check lean-out |
| Straight-edges + 8 ft blocks | Pair | Toe-in measurement guide |
3. Build Procedure
- Mock-up alignment: Clamp blank frames, position cart 8" ahead rear axle.
- Frame prep: Drill bike frame tubes at mount points, sleeve insert, tack inside and outside.
- Weld brackets: Use short TIG tacks, add gussets to minimize structural fatigue.
- Cart frame side: Mirror mount points, verify hole alignment and bracket geometry.
- Attach bolts & Heim: Use Grade 8 bolts and rod ends; lock-nuts and washers.
- Toe-in setup: Use straight-edges-set front-sidecar wheel closer by 1/2" over 8 ft. :contentReference[oaicite:13]{index=13}
- Lean-out adjustment: Apply 75 lb weight, set angle gauge to 2-3° lean away from sidecar. :contentReference[oaicite:14]{index=14}
- Test-ride & iterate: Tighten hardware, adjust, ride again, re-check alignment.
4. Welding & Alignment Tips
- Practice TIG on scrap. Use short beads, peck-tack technique.
- Cool welds slowly to avoid cracking.
- Use gussets & boxed sections to distribute stress.
- Upper strut brackets: ideally bolt-on/clamped, not direct weld—unless reinforced. :contentReference[oaicite:15]{index=15}
5. Safety & Final Checks
- Helmet, reflector, side-flag, seatbelt if carrying passenger/cart occupant.
- Inspect bolts and welds after initial 50 miles.
- Ride low and slow at first-get the handling dialed in.
- Obey your local bike laws.
Welding for First-Timers: Gear, Torch Types, and How It All Works
Never touched a welder before? No sweat. This section will break it down step by step-gear you'll need, what welding actually involves, and which welding method is best for you.
Equipment You'll Need to Get Started
Here's the starter gear checklist to weld safely and effectively:
1. Welding Machine: A 110V or dual-voltage welder is ideal for garage or home use. You want something that handles light-duty steel tubing (up to 1/8"). Brands like Lincoln, Hobart, Forney, or YesWelder make solid beginner units.
2. Welding Torch / Gun: This comes with your machine. The type depends on which welding method you choose (MIG, TIG, or Stick).
3. Welding Helmet: Auto-darkening is essential. Pick one with adjustable shade settings and reaction time.
4. Welding Gloves: Go with flame-retardant leather—heat-resistant and flexible.
5. Jacket or Apron: Leather or treated cotton to protect your arms, chest, and body.
6. Clamps & Magnets: Lock parts into place. Magnetic corner clamps are your best friend for this build.
7. Angle Grinder: Used for cleaning welds, removing slag, prepping bare metal, or cutting tube.
8. Wire Brush & Metal Prep: You must clean off paint, rust, or coatings before welding. Clean metal = strong welds.
What's Actually Happening When You Weld?
You're melting steel and fusing it back together. But with control. Think of it like gluing metal with lightning-but you aim the arc and control the heat.
Welding involves creating a high-temperature electric arc between your torch and the metal surface. This melts both the base metal and the filler wire (or rod), and when they cool together, they fuse into one solid structure. It's the same science used on skyscrapers and bridges-but you're doing it on a bike frame.
Welding Types: Which One Should You Use?
Here's a no-BS breakdown of the three main types, and which one is best for beginners like you:
MIG Welding (Best for Beginners)
- MIG = "Metal Inert Gas" welding.
- Uses a spool-fed wire and shielding gas (like Argon/CO2 mix).
- Easiest to learn and very forgiving on mild steel tubing.
- Ideal for bike frame mods, sidecar brackets, and auto repair.
- Minimal clean-up just wire brush after welds.
- Go with this if it's your first time. You'll get clean, strong welds quickly.
- TIG = "Tungsten Inert Gas".
- Uses a fixed tungsten electrode and separate filler rod.
- Precise and clean, but much harder to master.
- Requires two hands: one for torch, one for filler.
- Excellent for aluminum or thin-walled tubing.
- Skip this for now unless you're patient and already handy with hand tools.
- Also called SMAW. Cheap and portable.
- Creates lots of slag, hard to use on thin tubing.
- Better for farm equipment and thick steel.
- Not recommended for a lightweight bike frame—too much heat, too rough.
MIG Welding in Action - Quick Process Overview
Here's the basic process when you're holding that torch:
- Clean both surfaces to bare metal with an angle grinder or wire wheel.
- Clamp pieces tightly in place-no gaps or wobble.
- Set your voltage and wire feed rate based on metal thickness (your machine will have a cheat sheet).
- Hold the torch at a 10-15° angle, start the arc, and move in a smooth, steady pace.
- Listen for a "sizzle" like bacon frying. That's the sweet spot.
- Finish your bead, stop the arc, and inspect for consistency (no holes or bubbles).
- Let it cool naturally-don't quench it.
- Hit it with a wire brush or grinder if needed.
Summary: What You'll Actually Need
- MIG Welder (110/220V)
- Solid-core welding wire (0.030" or 0.035")
- Argon/CO2 gas bottle + regulator
- Auto-darkening helmet
- Leather gloves and jacket
- Steel wire brush
- Clamps, magnets, and prep tools
- Fire extinguisher (seriously)
- Flat, well-ventilated workspace
You don't need to be a pro-you just need patience, clean metal, and practice. You'll be stacking beads like a boss in no time.
Shop Beginner Welder Kits
Gear up for your first MIG welding experience: budget-friendly, forgiving, and perfect for light structural work.
Watch First: MIG Welding Tutorials
These YouTube videos break down set-up, bead-stacking, and technique so you learn visually before you 'spark'.
- How to MIG Weld - The ULTIMATE Beginner's Guide
- MIG Welding 101 for Beginners
- Master MIG Welding: Step-by-Step Guide
- MIG Welding Basics for Beginners
What You'll Actually Need
Pick up a beginner MIG kit (Hobart Handler, Forney, or Arccaptain), wire, shield gas + regulator, helmet, gloves, clamps, and grinder. Set up in a ventilated workspace and familiarize with safety gear before touching the torch.